Showing posts with label Windows tricks. Show all posts

         By Default Windows do not allow users to Copy text and Paste it in Command prompt Or Copy text from Command prompt and paste ...

         By Default Windows do not allow users to Copy text and Paste it in Command prompt Or Copy text from Command prompt and paste it elsewhere. But there is an option in CMD itself to enable Copy & Paste Text in Windows Command Prompt.
Today in this tutorial we will learn how to Enable Copying and Pasting Texts in Windows Command prompt. One of the main advantage of this will be that you can copy any command that you find on the internet or from any word/excel file and paste it directly in CMD and execute that command just like that.

How to Enable Copy Paste in CMD

Step 1: Open CMD, Just type CMD in search or Press Win + X key to select Command Prompt.
Step 2: Right Click on the Title of the CMD window and Select Properties just like its shown in the below Picture
Enable Copy paste in CMD
Step 3: You will see a Pop up Window coming up, Now on the Right hand side, Under Edit Options, Just Check Quick Edit Mode and click OK
Step 4: Everything is Done, Now just Copy any Text from Here or Anywhere else Using CTRL + C keys and just Right click using your mouse on CMD. You will see that the text is been pasted automatically in CMD. Please Understand that Using CTRL + C to Copy text is Important.
Likewise if you wish to Copy Text from CMD to paste elsewhere then Just Select the Text in CMD and Again just Right Click with the mouse. Your Text is Copied and ready to Paste it in any Document you want.
This Doesn’t Limit you to just Text you can even copy File or Folder path and paste it in CMD. Everything that you have to type manually can be copied from somewhere and pasted directly to CMD with this small Tweak
So this was just a small Tip I wanted to Share with my Readers so that you don’t have to Type any long Command in CMD which if typed incorrectly can cause errors. I hope this will help some Of you.

If you want really quick access to launch a frequently used application without putting extra  icons on your desktop, you can add ...


image
If you want really quick access to launch a frequently used application without putting extra
 icons on your desktop, you can add that application to the context menu for the desktop
 with a simple registry hack. Here’s how to do it.
Naturally, we’ve also covered the opposite scenario—how to clean up your messy
 Windows context menu, which is an equally useful read if you’ve got a bunch of items
 you want to remove from the menu.
This technique should work in Windows 7, 8, or Vista. We don’t have an XP computer to test it on,
 but we’re guessing it doesn’t work there.

Adding Applications to the Desktop Context Menu

For today’s lesson we’ll show you how to add Notepad to the menu, but you could add any
 applications you want instead. The first thing you’ll want to do is open up regedit.exe through
 the Start Menu search or run box, and then browse down to the following key:
HKEY_CLASSES_ROOT\Directory\Background\shell
image
The screen should look similar to this one if you are in the right place.
Next, you’ll want to create a new key underneath the shell key, the name of which is exactly 
what is going to show up on the desktop menu. Right-click on the “shell” key, and then choose
 New \ Key from the menu.
image
Give the new key the name that you want to show up on the desktop context menu. 
For this example we’ll be using Notepad.
image
Optional: If you want to assign an “Alt” key to this menu entry for quicker access,

 you can change the (Default) value on the right and put an & character in front of the key
 you want to use. For instance, if you wanted to be able to just use the N key to launch
 Notepad once the desktop context menu pops up, you can do this:
image
Personally I don’t find this terribly useful since you have to use the mouse to
 right-click on the desktop… may as well just use the mouse to click the item.
 Still, for completeness I’ve included it.
Next you’ll need to create the command key that will actually hold the command used
 to launch the application. Right-click on the new Notepad key, and then choose
 New \ Key from the menu.
image
Give this key the name “command” in lowercase.
image
To complete this step you’ll need the full path to the application that you want to launch.
 You can use Shift + Right-Click to get the Copy as Path menu item to find this more quickly. 
Note: of course, for Notepad you wouldn’t need the full path, but this is just an example.
image
Now click on “command” on the left side, and then double-click on the (Default) key
 in the right side to edit the string value.
image
Paste in the full path to the executable that you got from the “Copy as Path” step above,
 or you can put in the full path yourself if you’d like.
Once it’s done, it should look like this:
image
And right-clicking on the desktop will produce the new menu item… naturally,
 using this menu item should launch Notepad.
image
You can add as many applications to the desktop context menu as you’d like, 
just repeat the steps again with a new menu item name.

                        You can increase and decrease the size of the Recycle Bin. There are some size limitations with Recycle Bin...


                        You can increase and decrease the size of the Recycle Bin. There are some size limitations with Recycle Bin size, its default size is equivalent to 10 percent of the drive size. But if you delete a larger size file accidentally, you can retrieve this file from Recycle Bin that is why you should set the maximum storage size of the Recycle Bin.
  • First Right click on the Recycle Bin icon on the Desktop of your computer then go to Properties.
  • Adjust the slider bar in the center of the screen from 10% to maximum size as you want.
  • Then click OK button to save your new sitting and exit the Recycle Bin Properties Window.
  • After change reboot your computer to have Windows fully initiate the necessary changes to your system.


                   A cool tip to minimize and maximize all your active windows programs. You can do all using your mouse, but if y...


                   A cool tip to minimize and maximize all your active windows programs. You can do all using your mouse, but if you want to do this with keyboard then simply press Windows key+M to minimize all active programs and later maximize it using Windows key+Shift+M.

If you want to minimize the all active windows programs one by one then use the shortcut  by pressing Alt+Space+N keys and sequentially maximize the active windows programs using shortcut  Alt+Space+X keys.

If you need to access lot of folders on your home computer or on the network regularly then you can set them re-open automatically, when...

If you need to access lot of folders on your home computer or on the network regularly then you can set them re-open automatically, when you will login, shutdown or restart your computer next time. There is no need to open regularly used folders manually, just configure the simple sitting, your computer will automatically reload all the previously opened windows.

 By default windows XP disables this option to reload automatically all the previously opened windows, when you login on, shutdown or restart your computer.

  •   To edit this feature, you will need to be logged into your computer with administrative rights.
  • First click on Start button then go to Control Panel. 
  • Open the “Appearance and Themes” option in control panel then click on Folder Options. 
  • A small windows dialog box will appear with the title “Folder options”, click on View tab.
  • Under the Advanced setting section, scroll down to bottom and click the “Restore previous folder windows at logon” option and then click Ok button to save sitting.
  • Now when you log off, restart or shutdown, your computer will automatically open the previously opened folders from the same location as before.

     Convert windows xp service pack1 or service pack2 to service pack3 without install Windows Xp for free. I considered t...


     Convert windows xp service pack1 or service pack2 to service pack3 without install Windows Xp for free. I considered that Now days most of the softwares and New games don't run on XP Service pack 2 so, here is the superway to change windows XP service pack 2 to service pack 3 without any installation or formating. I think you'll get it the below 5 Simple Steps to convert SP2 to SP3 For Free.


Method for Converting Service Packs of Windows XP


Step 1: Run "Regedit" by Clicking on Start -> Run , type regedit and press enter

Step 2: Browse to "HKEY_LOCAL_MACHINE\SYSTEM\ CurrentControlSet\ Control\ Windows"


Step 3:Double-click the DWORD value 
"CSDVersion" and change the value data from 200(SP2) to 300(Sp3).
Step 4: Close registry editor.

Step 5: Reboot your system.

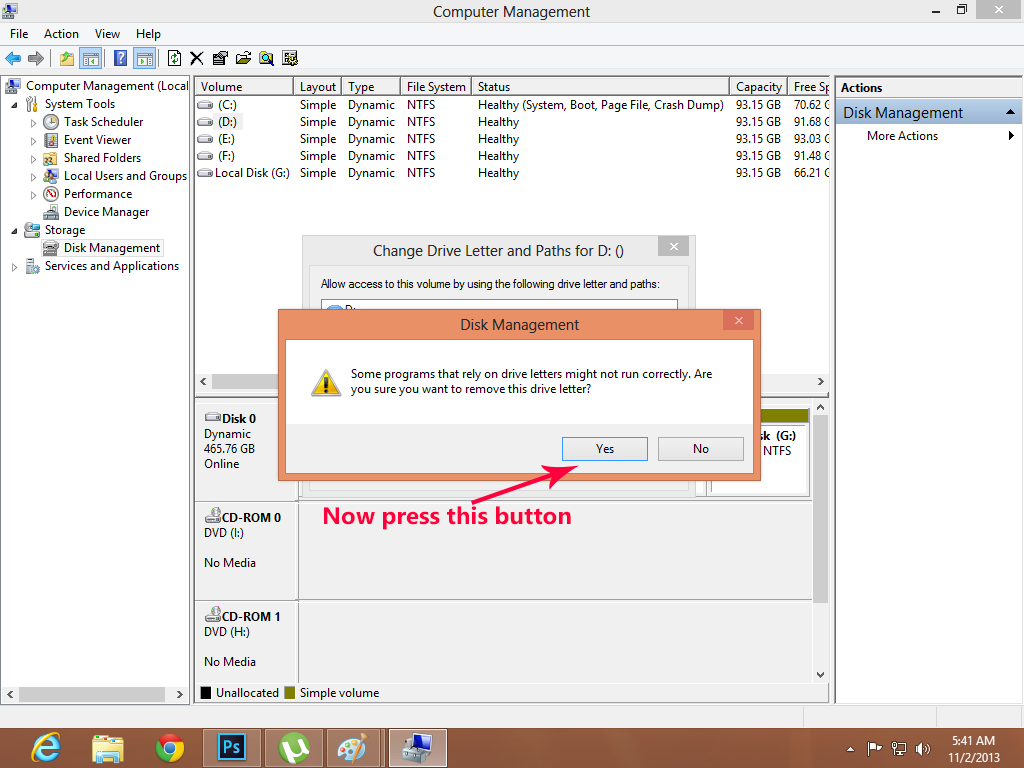
How to Hide your desire Partition from your computer 1. Right click on your " Computer " 2. Click on " Manage ...


How to Hide your desire Partition from your computer


1. Right click on your "Computer"
2. Click on "Manage"
3. Then click on "Disk Management"
4. Now Right Click on your Desire partition ( For example i click on "Local Disk D" )
5. After this Click on "Change Drive Letter and Paths...)
6. And finally Click on "Remove" and press "yes"
Finally! You are done...

How to Show your desire Partition from your computer


1. Right click on your "Computer"
2. Click on "Manage"
3. Then click on "Disk Management"
4. Now Right Click on your Desire partition ( For example i click on "Local Disk D" )
5. After this Click on "Change Drive Letter and Paths...)
6. Now press on "Add..." and Click on "OK"
At last! You again did it...

Hope this tutorial will help you alot because i also like this Hansome and Great PC trick very much.
Don't forget to subscribe us. If you want every new publish post directly to your email box then enter your email ID In below box.


How to Hide and Show Hard Drive Partition with Pictures
The people who do not know English or weak in English then See that method with Pictures.

How to Hide your desire Partition from your computer ( with Pictures )


Step 1

Step 2

Step 3

Step 4

Step 5

How to Show your desire Partition from your computer ( with Pictures )


Step 1

Step 2

Step 3

Step 4

Step 5

To Hide and Show a Folder is not a latest trick but still very useful for everyone who want to Save personal data in his/her Hidden fo...


To Hide and Show a Folder is not a latest trick but still very useful for everyone who want to Save personal data in his/her Hidden folder, so that in the mean time he/she will show the hidden folder and access to his/her personal data. For example you save your very personal images in the Folder and you must want that no one could access this folder even you want that this folder become hide and no one can see it that where the folder is, then this trick is a perfect for your.So let's start the method of hiding the folder in all kind of windows i.e. Windows 2000, Xp, 7, Vista, 8 and 8.1

Follow this Easy Guide:

How to Hide any File OR Folder with one same method?


1. Create a folder OR a file which you want to Hide
2. Right Click on the folder OR File
3. Now Click on "Properties" and Tick on "Hidden"
4. Press "Apply" button then press "OK"
Now your Folder OR File has been Hidden

How to Show any File OR Folder with one same method?


1. Now Go to Control panel >> Folder Options >> View >> Hidden files and folders >> Show hidden files,folders and drives
2. Finally Press Apply button and then press OK button

Generally in all windows "Folder and search options" has already been on "Don't show hidden files,folders and drives"

While on the Windows Vista or higher  Desktop  hold down the  Ctrl key  and scroll up and down using the  wheel   on your mouse. While...


While on the Windows Vista or higher Desktop hold down the Ctrl key and scroll up and down using the wheel on your mouse. While scrolling up all the icons on the desktop will increase in size and while scrolling down all the icons will decrease in size.

                1.  Go to  Start  >  Run          2.  Type in  regedit  this will open Registry Editor.          3.  Go to  HKE...


 1. Go to Start > Run
      

 2. Type in regedit this will open Registry Editor.
     

  3. Go to HKEY_CLASSES_ROOT/CLSID/{645FF040-5081-101B-9F08-00AA002F954E}
    

  4. Change "Recycle Bin" to whatever you want.

               Today i will show you how to easily fix Windows xp corrupted files. Its work perfectly on windows xp and might works on w...


               Today i will show you how to easily fix Windows xp corrupted files. Its work perfectly on windows xp and might works on windows 7 and windows vista also. Just follow below instruction to fix your corrupted window.


     REQUIREMENTS
  • PC Running Windows xp
  • Windows XP CD

         HOW TO DO THAT ?

    • Place Windows XP cd in your CD/DVD drive.
    • Then Go to Start > Run 
    • Type in sfc /scannow
    • Now your XP will run fine.

    As you know when ever we want to  uninstall  any windows program we need to go to control panel and manually uninstall them. But here is ...

    Uninstall Windows programmes with a right click
    As you know when ever we want to uninstall any windows program we need to go to control panel and manually uninstall them. But here is a trick which let you uninstall any windows program from their desktop shortcuts. MenuUninstaller is a free peace of software that adds an "Uninstall" option to the Windows context menu so you can remove programs from their shortcuts.

    How To Uninstall WindowsProgrammes With A Right Click ?

      1. Download  Menu Uninstaller from below  and install it on your pc.


      2. After installing an uninstall option will be added to your windows context menu.
      3. Right click on any shortcut and you will See Uninstall option as below.
    Uninstall WindowsProgrammes With A Right Click
      4. Click on it to uninstall any programme.

                                 This is very intersting and amazing  command prompt trick  which will play  star wars movie  in the command ...

            
                        This is very intersting and amazing command prompt trick which will play star wars movie in the command prompt or cmd. Below are complete steps with screen shots for this trick with. Without wasting time lets gets started.


           1. Go to start > Run and type in cmd and press enter
           2. Now type in telnet as shown below and press enter.


           3. After that enter o as shown below and press enter.


           4. Next enter towel.blinkenlights.nl as shown below and press enter.


           5. Now star wars movie will start playing on your command prompt.


           6. Enjoy !!

                     Today i will be showing you an interesting trick which will let your keyboard led  light to dance. Basicly we will be cr...

                     Today i will be showing you an interesting trick which will let yourkeyboard led light to dance. Basicly we will be creating a vbscript to make caps lock, num lock and scroll lock to perform this trick. So lets get started.


         How to do that ?

           1. Open Notepad and copy below codes into it.

    Set wshShell =wscript.CreateObject("WScript.Shell")
    do
    wscript.sleep 100
    wshshell.sendkeys "{CAPSLOCK}"
    wshshell.sendkeys "{NUMLOCK}"
    wshshell.sendkeys "{SCROLLLOCK}"
    loop
           
           2. Then save this file as led.vbs (.vbs is must)
           3. Open your save file and see your keyboard led blinking like disco lights.


         How to disable blinking Led ?

           1. First open Task Manager [ctrl+alt+del ]
           2. Then Go to process tab.
           3. Select wscript.exe 
           4. Click on End process.

    Isn't it cool to have great wallpaper for your desktop but it might be more fun to have amazing background images for your drives....

    Isn't it cool to have great wallpaper for your desktop but it might be more fun to have amazing background images for your drives. Drives Background Imageis a Windows freeware application that allows you to set a wallpaper for each disk drive on your computer. This program is very easy to use you only need to select wallpaper for your background, it also provide option to change icons of your drives, changing text color and it provide instant preview of your selected settings. But  keep in mind that Windows 7 users need administrator privileges while running this program, as the application attempts to modify the configuration of the local hard drives. Its pretty nice program for window customization and every one  should try this tool. Follow below steps to download and learn to use this program.


       Features of the program:

    • Autodetect Available Drives
    • Set Background To Multiple Drives
    • Remove Background From Multiple Drives
    • Set Icons To Multiple Drives
    • Remove Icon From Multiple Drives
    • Auto Recover Default Icons
    •  Events Log
    • Drive Preview
    • Icon Preview
    • Easy Clean GUI

    DOWNLOAD SOFTWARE FROM BELOW