Showing posts with label Windows 8. Show all posts

Lot of Things Changed in Windows 8 as Compared to Windows 7, Start Screen Was One of the Addition to Windows 8, Have a look at 5 Ways to C...

Lot of Things Changed in Windows 8 as Compared to Windows 7, Start Screen Was One of the Addition to Windows 8, Have a look at 5 Ways to Customize Windows 8 Start screen , And Couple of things have Even Disappeared From Windows 8 like Start Button and Hibernate Option. Probably the Reason Microsoft Disabled Hibernate option is Because Windows 8  Boots up and Shuts down Faster then The Older Versions. But if you Wish to Enable Hibernate In Windows 8 then Continue Reading.

What is Hibernate ?


Before Moving Forward let us have a Short Explaination About What Hibernate actually is.
Hibernation is powering down a computer while retaining its state. Upon hibernation, the computer saves the contents of its random access memory (RAM) to a hard disk or other non-volatile storage. Upon resumption, the computer is exactly as it was upon entering hibernation. When used to save power, hibernation is similar to sleep mode and saves more power at the cost of slower resumption.


Steps To Enable Hibernate In Windows 8


Hibernate Option is Actually Hidden in Windows 8, We Can easily Unhide it and Enable it. Just Follow The Below Simple Steps to Enable Hibernate In Windows 8
Step 1: Press Win + W key ie: Windows key and “W” key to open up Setting search menu. Then Type “Power” , Windows will Show you Few Results, You have to Click on “Power Option”
Step 2: Now From the Left Pane, Click on Choose What the Power Button do.
Enable Hibernate In Windows 8
Step 3: Then on Next Screen Click on  Change Settings that are currently Unavailable.
Step 4:  Now Scroll Down to “Shutdown Settings” Section, and Check  Hibernate box to Enable it and Click on Save Changes.Enable Hibernate in Windows 8
Step 5: Everything is done, Now next time whenever you need to Hibernate your PC, just Move your Mouse pointer to right corner of your screen to Show up Charm screen, Click on Setting> Power.
Enable Hibernate in Whindows 8
You will notice Hibernate Option added there. So in this Tutorial we Saw What Hibernate is and how to Enable Hibernate In Windows 8, Hope this Helps you 

WINDOWS 8.1   Microsoft built Windows 8 to bring a modern computing experience to businesses and to help professionals stay connect...


WINDOWS 8.1  Microsoft built Windows 8 to bring a modern computing experience to businesses and to help professionals stay connected to their colleagues and clients from anywhere, anytime. Windows 8.1 advances this vision and introduces new manageability, mobility, security, user experience and networking capabilities–with the goal of offering customers the best business tablets and versatile modern business PCs driven by the most powerful operating system designed for today’s modern businesses.
  • Workplace Join
  • Work Folders
  • Open MDM
  • Mobile Device Management
  • Web Application Proxy
  • RDS Enhancements
  • NFC Tap to pair Printing
  • Wi-Fi Direct Printing
  • Native Miracast Wireless Display
Mobility Enhancements
  • VPN
  • Auto-triggered VPN
  • Mobile Broadband
  • Windows To Go
  • Broadband Tethering
Security Enhancements
  • Remote Business Data Removal
  • Improved Biometrics
  • Pervasive Device Encryption
  • Improved Internet Explorer
  • Malware Resistance
  • Device Lockdown

Product Keys: 334NH-RXG76-64THK-C7CKG-D3VPT

                                                                            OR 
                            

                        JDTF8-NTCJX-PVYD8-CYQ83-7T8KB


Note: These are torrent files. You must install utorrent for download these files.


Download Windows 8.1 Pro 64Bit


Download Windows 8.1 Pro 32Bit


Customize your tiles Make the most of your Windows Start screen tiles by adjusting the sizes, where they are located, and what is li...

Windows 8 tiles

Customize your tiles
Make the most of your Windows Start screen tiles by adjusting the sizes, where they are located, and what is listed.
  • Move any tile by clicking and dragging the tile. While moving a tile, if you need a larger view of the Start screen move the tile towards the top or bottom of the screen to zoom out.
  • Use your mouse wheel to scroll left-to-right through your tiles.
  • Any Desktop shortcut or program can be pinned to the Start screen by right-clicking the icon and choosing Pin to Start.
  • In the bottom right-hand corner of the start screen is a magnifying glass with tiles, click this icon to get a zoomed out view of your Start screen. In this view, if you right-click on a group of tiles you'll be given the option to name group, which can be useful if you have a group of related tiles (e.g. games). In this view, you can also click and drag a group to organize your tile groups.
  • Create a new speed bump between tile groups by moving a tile to a speed bump.
  • Resize any User tile or Live tile by right-clicking the tile and choosing resize.
  • If there is a tile you want on your Taskbar, right-click the tile and choose Pin to taskbar.
  • Show admin applications on the Start screen by clicking Settings in Charms, click Settings, and change the Show administrative tools from No to Yes.
  • In Internet Explorer 10, you can also pin any of your favorite web pages to your Start Screen.
Windows 8 keyboard shortcuts
Knowing at least some of the Windows 8 keyboard shortcuts will make your Windows 8 experience much more enjoyable. Try to memorize these top Windows 8 shortcut keys.
  • Press the Windows key to open the Start screen or switch to the Desktop (if open).
  • Press the Windows key + D will open the Windows Desktop.
  • Press the Windows key + . to pin and unpin Windows apps on the side of the screen.
  • Press the Windows key + X to open the power user menu, which gives you access to many of the features most power users would want (e.g. Device Manager and Command Prompt).
  • Press the Windows key + C to open the Charms.
  • Press the Windows key + I to open the Settings, which is the same Settings found in Charms.
  • Press and hold the Windows key + Tab to show open apps.
  • Press the Windows key + Print screen to create a screen shot, which is automatically saved into your My Pictures folder.
Know your hot corners
The corners on your screen are hot corners and give you access to different Windows features. Below, is a brief explanation of each of these corners.
Bottom Left-hand corner
The bottom left-hand hot corner of the screen will allow you to access the Start screen, if you're in the Start screen and have the Desktop open, this corner will open the Desktop from the Start screen.
Tip: Right-clicking in the left hand corner will open the power user menu.
Top-left corner of the screen
Moving the mouse to the top-left corner and then down will display all the apps running on the computer. Clicking and dragging any of these apps to the left or right-hand side of the screen will snap that app to that side of the screen. Each of these open app icons can also be right-clicked to close or snap.
Right-hand side of the screen
On the full right-hand side of the screen will be given access to the Windows Charms.
Taking advantage of search
The Search in Windows 8 has been significantly improved when compared to all previous versions of Windows. To search for a file or run a program in Windows 8 from the Start screen just start typing what you're trying to find or want to run.
As you begin typing, the results will start appearing on the left-hand side. In addition to being able to search for files and run programs, the Search also supports limiting the search to apps such as Finance, People, Maps, Photos, Mail, Music, Videos, Weather, and much more. If what you are searching for is not a file or program, click on the app you wish to use as the search. For example, if you were searching for "New York" and selected the Weather App you would be shown the weather in New York, NY.
By default, Search organizes the available Apps by how frequently they are used and then in alphabetical order. If you want to keep your favorite app at the top of the Search list, right-click the app and choose Pin. Pinning the app will lock it in place regardless of how often it is used. If there is an app you don't want (e.g. Finance) you can turn on and off any of the search apps through the PC settings, which is found under the Settings in the Charms.
Bonus tip: The Search is also found through Charms and can also be opened by pressing Windows key + F.
Running two apps side by side
Any app can be pinned to the left or right-hand side of the screen. For example, open the People app and then press the Windows Key + . (period) to move that app to the right-hand side of the screen, pressing the same keys again will move it to the left-hand side, and pressing the same keys again will make it full screen. While an app is pinned, any other app or program can be opened and loaded into the available space on the screen. For example, in the below picture, we've opened a browser window and have the People app running to monitor our social networks.
Any open app can also be pinned using your mouse by clicking at the top of the tile and dragging it to the left or right-hand side of the screen.
Bonus tip: The Desktop can also be pinned to the left or right-hand side of the screen.
Note: In order for snap to work properly your resolution must be at least 1,366 x 768.
Windows 8 Task Manager
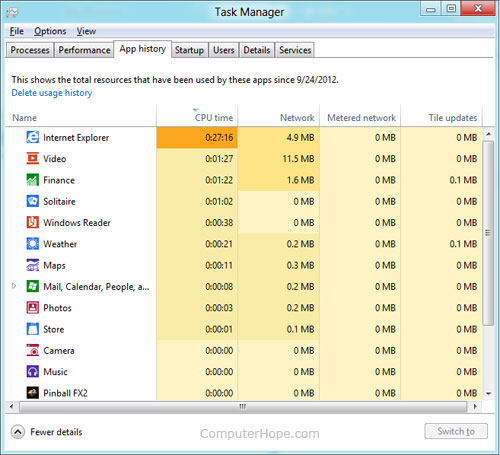
The Windows 8 Task Manager has been significantly improved over previous versions of Windows. Some of the new changes include showing a total percent usage at the top of your Processes, which makes it easier to determine total memory and CPU usage, improved Performance graphs, a Startup tab to see startup processes and their impact to system performance, and the App history tab (as shown below) that gives you the total resources an app has used over a period of time. Press Ctrl + Shift + Esc to start exploring the new Task Manager.
Windows 8 Task Manager
Use a picture password to log into your computer
Windows 8 includes a new feature called Picture password, which allows you to authenticate with the computer using a series of gestures that include circles, straight lines, and taps. Enable this feature if you want a new way to access your computer or have a hard time with passwords.
  1. Open the Windows Charms.
  2. Click Settings and then More PC settings
  3. In the PC settings window click Users and then select Create a picture password
Bonus tip: A four digit pin password can also be created and used to access your computer.
Take advantage of Windows 8 apps
Windows 8 comes included with several apps to help you get the most from your computer. Below are just a few of the included apps.
People
Microsoft touts the People feature in Windows 8 because they understand how many people are using social networks today. In the People feature you'll be able to connect your Windows computer to all the major social networks including Facebook, LinkedIn, and Twitter. Once connected, you can pin the people app and monitor your social network (as shown below), use People in Search to find people, and get an overview of what is happening in all your social networks.
Reader
The Reader app will give you PDF support right out of the box.
SkyDrive
The SkyDrive app will give you access to the Microsoft cloud service SkyDrive, which allows you to store your photos, documents, and other files in the cloud and access or share those files with any computer with Internet access.
Store
Take advantage of the Windows Store and install one or more of the thousands of available apps designed for Windows 8. The Store is found in the Start screen, or use Search to search the Store app for any apps that you are trying to find.

We all know that Microsoft introduced Windows Metro UI apps in  Windows 8 . Using it, we can download our favorite app, from the Windo...


We all know that Microsoft introduced Windows Metro UI apps in Windows 8. Using it, we can download our favorite app, from the Windows Store, straight to our Windows. However, it may happen at times, that the download does not complete and you receive the following error message:

Your purchase couldn’t be completed. Something happened and your purchase can’t be completed


In this article, we will show you how you can troubleshoot the issue and solve the problem.
Many users face the “Your Purchase Couldn’t Be Completed” error, while sometimes users may even receive additionally, an error code like 0×80070422. This error is received for free as well as for paid apps. However, these kind of errors need similar treatment. You do not need to carry out all these suggestions. Just see which one helps you.
  • First of all make sure you have set the correct region, time and date. Change the settings if required.
  • Run System File Checker to verify the integrity of your system files. Reboot.
  • Next clear the app cache and see if this helps.
  • Moving on, you could run the Windows App Troubleshooter and see if it helps you. This will fix issues concerning resolution, drivers etc.
Having done these basics, you could move on and see if any of these fixes help you:

Switch to local account from Microsoft account or vice versa

1. Press Windows Key + I on desktop, the click Change PC Settings.
2. Navigate to Users in LHS, then under your user account, click Switch to a local account. That’s it. Reboot and your problem should be fixed now.

Restart Windows Updates

1. Press Windows Key + Q, type cmd. Pick Command Prompt from search results.
2. Right click on Command Prompt, from bottom options, select Run as administrator.

3. Now run these command one by one:
  • net stop wuauserv
  • net start wuauserv
Reboot once, you might not experience the issue again. If you still face the issue then try next suggestion.

Ensure that Windows Update service to start automatically

By default, Windows Update service is set to start automatically. But if you have changed some settings, you could reset Windows Update setting back to its default via the Control Panel or carry out the following steps:
1. Press Windows Key + R , type service.msc in the Run dialog box. Click OK.
2. From the Services window, look for Windows Update service, since you’re facing the issue, it may have Disabled or Manual Startup type.

3. Double click on same service to modify its Startup type. Select Automatic from the drop down list as shown. Click Apply followed by OK.

Now reboot. Hopefully, you’ll no longer encounter the issue.....!!!

Windows 8 Professional has arrived. A prerelease version of Windows 8, it’s Windows reimagined and reinvented. Windows 8 Release Previ...


Windows 8 Professional has arrived. A prerelease version of Windows 8, it’s Windows reimagined and reinvented. Windows 8 Release Preview It’s Windows reimagined and reinvented from a solid core of Windows 7 speed and reliability. It’s an all new touch interface. It’s a new Windows for new devices. And it’s easy to try now whether you’re installing it for the first time, or moving from Windows 8 Consumer Preview.
Get the tools you need to build Metro style apps for Windows 8. Our free download includes Microsoft Visual Studio Express 2012 for Windows 8 and Blend for Visual Studio to help jumpstart your app development project.
Our docs are optimized to make you more productive. Discover everything you need to plan, build, and sell great apps in the Windows Store.
Windows 8 has many powerful features for developers. Discover the new features for Desktop, Web, and Metro style app developers.
Dev Camps are free events that bring together developers like you to learn more about building apps. Learn interactively and get advice from expert app developers in hundreds of locations around the world.
The more apps you have, the better your experience. Apps can work together and share info, making it easier for you to do what you want.
There’s an app for everyone. Browse lists of top apps, view staff recommendations, and get personalized picks based on apps you already own. And access is easy the Store is built directly into Windows 8.
Now’s the time to build apps that’ll launch your business worldwide. Download free tools and samples, find design and code resources, and get expert help from Windows Dev Center.


SYSTEM REQUIREMENTS


Processor= 1.4GHz (32Bit)
For 64Bit 1.8GHz
RAM= 1GB (32Bit)
For 2GB (64Bit)


INSTRUCTIONS


This is Torrent Download File, You must be Install uTorrent in Your Computer
Click Here to Download uTorrent
Download with torrent and Burn it in DVD
Already Bootable
Product Key: TK8TP-9JN6P-7X7WW-RFFTV-B7QPF

OR

USE WINDOWS 8 ACTIVATOR : DOWNLOAD ACTIVATOR FROM HERE


DOWNLOAD WINDOWS 8 FROM BELOW

As you know when ever we want to  uninstall  any windows program we need to go to control panel and manually uninstall them. But here is ...

Uninstall Windows programmes with a right click
As you know when ever we want to uninstall any windows program we need to go to control panel and manually uninstall them. But here is a trick which let you uninstall any windows program from their desktop shortcuts. MenuUninstaller is a free peace of software that adds an "Uninstall" option to the Windows context menu so you can remove programs from their shortcuts.

How To Uninstall WindowsProgrammes With A Right Click ?

  1. Download  Menu Uninstaller from below  and install it on your pc.


  2. After installing an uninstall option will be added to your windows context menu.
  3. Right click on any shortcut and you will See Uninstall option as below.
Uninstall WindowsProgrammes With A Right Click
  4. Click on it to uninstall any programme.

                             This is very intersting and amazing  command prompt trick  which will play  star wars movie  in the command ...

        
                    This is very intersting and amazing command prompt trick which will play star wars movie in the command prompt or cmd. Below are complete steps with screen shots for this trick with. Without wasting time lets gets started.


       1. Go to start > Run and type in cmd and press enter
       2. Now type in telnet as shown below and press enter.


       3. After that enter o as shown below and press enter.


       4. Next enter towel.blinkenlights.nl as shown below and press enter.


       5. Now star wars movie will start playing on your command prompt.


       6. Enjoy !!

                 Today i will be showing you an interesting trick which will let your keyboard led  light to dance. Basicly we will be cr...

                 Today i will be showing you an interesting trick which will let yourkeyboard led light to dance. Basicly we will be creating a vbscript to make caps lock, num lock and scroll lock to perform this trick. So lets get started.


     How to do that ?

       1. Open Notepad and copy below codes into it.

Set wshShell =wscript.CreateObject("WScript.Shell")
do
wscript.sleep 100
wshshell.sendkeys "{CAPSLOCK}"
wshshell.sendkeys "{NUMLOCK}"
wshshell.sendkeys "{SCROLLLOCK}"
loop
       
       2. Then save this file as led.vbs (.vbs is must)
       3. Open your save file and see your keyboard led blinking like disco lights.


     How to disable blinking Led ?

       1. First open Task Manager [ctrl+alt+del ]
       2. Then Go to process tab.
       3. Select wscript.exe 
       4. Click on End process.

Isn't it cool to have great wallpaper for your desktop but it might be more fun to have amazing background images for your drives....

Isn't it cool to have great wallpaper for your desktop but it might be more fun to have amazing background images for your drives. Drives Background Imageis a Windows freeware application that allows you to set a wallpaper for each disk drive on your computer. This program is very easy to use you only need to select wallpaper for your background, it also provide option to change icons of your drives, changing text color and it provide instant preview of your selected settings. But  keep in mind that Windows 7 users need administrator privileges while running this program, as the application attempts to modify the configuration of the local hard drives. Its pretty nice program for window customization and every one  should try this tool. Follow below steps to download and learn to use this program.


   Features of the program:

  • Autodetect Available Drives
  • Set Background To Multiple Drives
  • Remove Background From Multiple Drives
  • Set Icons To Multiple Drives
  • Remove Icon From Multiple Drives
  • Auto Recover Default Icons
  •  Events Log
  • Drive Preview
  • Icon Preview
  • Easy Clean GUI

DOWNLOAD SOFTWARE FROM BELOW

Ever wanted to set cool videos as your computers Desktop Wallpaper, then you came to right place. Today in this post i will teach you ...

video wallpaper
Ever wanted to set cool videos as your computers Desktop Wallpaper, then you came to right place. Today in this post i will teach you how to set videos as your Desktop Wallpaper with a simple nice little trick and small tool or software that mostly every one has installed on their computer or laptop. This trick works on  Windows Xp as well as it works on windows 7. Go through below post to learn this simple trick.


How to set video as desktop wallpaper ?

   1. Open VLC Media Player. If you don't have it download it frome Here.
   2. Then Go to Tools > Preference Or press CTRL + P and Selecet Video from left panel
   3. Then Choose DirectX video output from output dropdown list
      as shown in below image .
Video wallpaper

   4. Save the changes ans restart VLC Media Player.
   5. Play any video you would like to set as your desktop wallpaper.
   6. Then click on Video and select DirectX Wallpaper from the dropdown list as show in below image.
Video wallpaper


   7. Now Minimize vlc player and you will see your video running on your desktop as wallpaper.
   8. If you want your default wallpaper back then uncheck DirectX Wallpaper from video dropdown list.
   9. Hope you like this simple trick share your thought about this trick in comment section.

Most of you download and use pirated software from torrents or any such other sites, but sometime it gets very difficult to find serial ...

Most of you download and use pirated software from torrents or any such other sites, but sometime it gets very difficult to find serial key of those softwares. I will make it easy for you by showing you simple yet very intersting google trick which will allow you to find serial key of any software very easily.

How To Find Serial Key Of Any Software ?

The key 94FBR is a part of  Office 2000 Pro CD activation key that is widely distributed as it bypasses the activation requirements of Office 2000 Pro. By searching for 94fbr and the product name, you are guarantee that the pages that are returned are pages dealing specifically with the product you're wanting a serial for. Follow simple steps given below to learn this trick

    1. Go to Google
    2. Then type  Software Name 94FBR
  • Replace Software Name with the name of software whose serial key you want to find
  • Eg: To find serial key of Nero i will type Nero 94fbr
    3. Now press Enter and you will find serial key of software you are looking for as shown below.
google trick to find serial key

Most of the Peoples are not aware that it is possible to create Undeletable, Unrenamable folder in windows without any software. To Test...

creating undeleteable files
Most of the Peoples are not aware that it is possible to create Undeletable, Unrenamable folder in windows without any software. To Test this concept just follow simple steps given below.

Try to make a new folder in windows & give it name con,aux, lpt1, lpt2, lpt3 up to lpt9. you won't be allowed to create folder with above mentioned names, Because they are reserved words in windows.

How To Create Undeletable And Unrenamable Folders ?

  1. Go to Start and then Click on Run
  2. Type cmd & hit enter (To open Command Prompt ).
  3. Remember you cannot create Undeletable & unrenamable folder in your root directory (i.e. where the windows is installed) That means you can't make this kind of folder in C: drive if you installed windows on C:
  4. Type D: or E: and hit enter
  5. Type md con\ and hit enter (md - make directory)
  6. You may use other words such as aux, lpt1, lpt2, lpt3 up to lpt9 instead of con in above step.
  7. Open that directory, you will see the folder created of name con.
  8. Try to delete that folder or rename that folder windows will show the error message.

How to delete that folder ?

It is not possible to delete that folder manually but you can delete this folder by another way mentioned below.
  1. Open Command Prompt
  2. Type D: ( if u created this type of folder in D: drive) & hit enter
  3. Type rd con\ (rd - remove directory)
  4. Open that directory and the folder will not appear because it is removed.