Showing posts with label Windows xp. Show all posts

If you need to access lot of folders on your home computer or on the network regularly then you can set them re-open automatically, when...

If you need to access lot of folders on your home computer or on the network regularly then you can set them re-open automatically, when you will login, shutdown or restart your computer next time. There is no need to open regularly used folders manually, just configure the simple sitting, your computer will automatically reload all the previously opened windows.

 By default windows XP disables this option to reload automatically all the previously opened windows, when you login on, shutdown or restart your computer.

  •   To edit this feature, you will need to be logged into your computer with administrative rights.
  • First click on Start button then go to Control Panel. 
  • Open the “Appearance and Themes” option in control panel then click on Folder Options. 
  • A small windows dialog box will appear with the title “Folder options”, click on View tab.
  • Under the Advanced setting section, scroll down to bottom and click the “Restore previous folder windows at logon” option and then click Ok button to save sitting.
  • Now when you log off, restart or shutdown, your computer will automatically open the previously opened folders from the same location as before.

     Convert windows xp service pack1 or service pack2 to service pack3 without install Windows Xp for free. I considered t...


     Convert windows xp service pack1 or service pack2 to service pack3 without install Windows Xp for free. I considered that Now days most of the softwares and New games don't run on XP Service pack 2 so, here is the superway to change windows XP service pack 2 to service pack 3 without any installation or formating. I think you'll get it the below 5 Simple Steps to convert SP2 to SP3 For Free.


Method for Converting Service Packs of Windows XP


Step 1: Run "Regedit" by Clicking on Start -> Run , type regedit and press enter

Step 2: Browse to "HKEY_LOCAL_MACHINE\SYSTEM\ CurrentControlSet\ Control\ Windows"


Step 3:Double-click the DWORD value 
"CSDVersion" and change the value data from 200(SP2) to 300(Sp3).
Step 4: Close registry editor.

Step 5: Reboot your system.

               Today i will show you how to easily fix Windows xp corrupted files. Its work perfectly on windows xp and might works on w...


               Today i will show you how to easily fix Windows xp corrupted files. Its work perfectly on windows xp and might works on windows 7 and windows vista also. Just follow below instruction to fix your corrupted window.


     REQUIREMENTS
  • PC Running Windows xp
  • Windows XP CD

         HOW TO DO THAT ?

    • Place Windows XP cd in your CD/DVD drive.
    • Then Go to Start > Run 
    • Type in sfc /scannow
    • Now your XP will run fine.

    To start fresh installation of xp professional perform the following steps 1. Insert the windows XP CD into your computer a...

    To start fresh installation of xp professional perform the following steps


    1. Insert the windows XP CD into your computer and restart your computer.


    2. if prompted to start from the CD, press SPACE BAR  if you miss the prompt
    it only appears for a few second ), restart your computer to try again.


    3. Windows XP setup begins, during this portion of setup, your mouse will not
    work, so you must use the welcome to setup page,press ENTER. the following
    figure shows the welcome to setup screen.


    4. on the windows XP licensing agreement page, read the licensing agreement.
     press the PAGE DOWN key to scroll to the bottom of the agreement. then press F8.


    5. pRess ENTER to select unpartitioned space, Which appears by default.
     this is Shown in the following figure :
    NOTE: if you have early partitioned drives then select only the drive
     you want to install windows.


    6. Press ENTER again to select Format the partition using the NTFS file system,
     which appears by default.
    this is shown in the following figure :


    7. windows XP ereses your hard disk drive using a process called formatting
     and then copies the setup files. you can leave your computer and return in 20 to 30 minutes.
    this is as shown in the following figure :


    8. Setup will now copy system files to the system / boot partition (s) you just created.
     this will allow the PC to boot from the C: drive and continue setup in GUI mode.


    Eject the CD and reboot - from hard disk this time. the GUI setup starts


    GUI - Based part of setup


    The following are the steps that you should perform while continuing the
     GUI-based part of windows XP professional installation :


    1. Click on the next button to accept the default settings for regional and language optional.
     the following figure shows the Regional and language optional page :


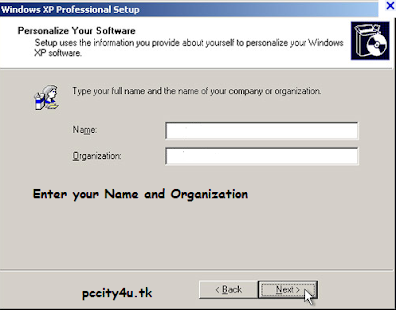
    2. Enter your name and the name of your organization in the personalize Your software page
     as shown in following figure :


    3. Enter the product key which comes with your installation CD
     in the your Product key page as shown in the following figure :


    4. Enter a computer name and administer password in the computer name
     and administrator password page as shown in the following figure :


    5. Enter the time setting


    6. Network setup option as shown in the following figure :


    Windows XP will spend 20 or 30 minutes configuring your computer and
     will automatically restart when finished. when the display setting dialog appears,
     click OK. the display settings dialog box shown in the following figure :


    Final installation Steps


    The final setup begins. perform the following steps to complete the
     installation procedure of Windows XP professional :


    1. On the welcome to Microsoft Windows page, click Next as shown in the following figure :


    2. On the ready to register with Microsoft ? page , click Yes, and then Click Next ,
     as Shown in the following figure :


    3. On the Thank You page Click Finish.


                                         !!!!!!......DONE..........!!!!!!

    Windows XP Service Pack 3 (SP3) includes all previously released updates for the Windows XP operating system, in addition to a small nu...


    Windows XP Service Pack 3 (SP3) includes all previously released updates for the Windows XP operating system, in addition to a small number of new updates. Windows XP SP3 will not significantly change the Windows XP experience. Installation media and documentation on disc for Windows XP SP3 may sometimes refer to Windows XP Service Pack 2 (SP2). Windows XP SP2 installation guide instructions apply to Windows XP SP3.
    Windows XP SP3 includes all previously released Windows XP updates, including security updates and hotfixes, and select out-of-band releases. For example, the service pack includes functionality previously released as updates, such as the Microsoft® Management Console (MMC) 3.0 and the Microsoft Core XML Services 6.0 (MSXML6).
    Microsoft is not adding significant functionality from newer versions of Windows, such as Windows Vista, to Windows XP through XP SP3. For instance, Windows XP SP3 does not include Windows Internet Explorer 7, although Windows XP SP3 does include updates to both Internet Explorer 6 and Internet Explorer 7, and it will update whichever version is installed on the computer. For more information about Internet Explorer 7, visit the Internet Explorer home page.
    One notable exception is that, SP3 does include Network Access Protection (NAP) to help organizations that use Windows XP to take advantage of new features in the Windows Server® 2008 operating system.
    Knowledge Base article 936929 lists all other all Knowledge Base articles associated with updates that are included in Windows XP SP3. The following sections also provide a high-level description of the functionality included in Windows XP SP3.
    Fundamentally, deploying Windows XP SP3 works the same as deploying SP1 and SP2 for Windows XP:
    SP3 is cumulative, so users can install SP3 on top of Windows XP SP1 or SP2.
    Windows XP SP3 supports the same languages as Windows XP did in its initial release.
    You can run the SP3 update package on any edition of Windows XP SP1 or SP2. For example, you can run the SP3 update package on a computer running the Windows XP Media Center Edition with SP1. The exceptions are Embedded editions for XP.
    Tools and guidance for system administrators have not fundamentally changed from Windows XP SP2. For comprehensive information, visit the Deploy Windows XP Professional and Windows XP Service Pack 2 Deployment Information sites on Microsoft TechNet.
    You can deploy SP3 using Microsoft Systems Management Server 2003, Microsoft System Center Configuration Manager 2007, or third-party solutions. The process has not fundamentally changed.
    Windows XP SP3 is for x86 editions of Windows XP only. The x64 editions of Windows XP were serviced by Windows Server 2003 SP2. For additional information, go to Windows Server 2003 Service Pack 2.
    This is the original Windows XP Professional SP3 (32 bit) ISO from Microsoft. Including Microsoft updates until 13.3.2013, Internet Explorer 8, Adobe Flash Player 11.6 and SATA drivers.
    * NO tweaks or add-ons.
    * NO additional programs and software added.
    * NO graphics, scripts and wallpapers added or changed.
    * NO serial needed during installation, the key is already inserted.
    * Activated and passes Microsoft Windows Genuine validation test.
    * It’s the original image from Microsoft except added updates, IE8, Adobe Flash Player (11.6.602.180) and SATA drivers!
    * Windows Messenger, MSN Explorer and Internet Explorer 6 were removed.

    INSTRUCTIONS

    This is Torrent Download File, You must be Install uTorrent in Your Computer
    Click Here to Download uTorrent
    Download with torrent and Burn it in DVD
    Already Bootable